Table of Contents
ToggleThat slow, creeping descent into your desk is maddening. You adjust your office chair, and within an hour, sometimes minutes, it’s sinking back down. An office chair that won’t stay up is one of the most common furniture problems homeowners and remote workers face, yet it’s rarely a reason to toss the chair and buy new. Most of the time, the issue stems from a single component: the pneumatic cylinder, or gas cylinder, that controls seat height. The good news? Fixing a sinking office chair is a straightforward DIY job that takes less than 30 minutes and costs $20–$50 in parts. You don’t need special tools or technical expertise, just a willingness to get under your chair and swap out a worn part.
Key Takeaways
- An office chair won’t stay up due to a failing pneumatic cylinder, which loses internal pressure over 3–7 years of use, and this problem affects both budget and high-end chairs.
- Diagnose a sinking office chair in 30 seconds by flipping it upside down, pressing on the seat to check for resistance, or listening for hissing sounds when adjusting the height lever.
- Replace the gas cylinder yourself in under 20 minutes for $20–$50 by removing the metal collar, sliding out the old cylinder, and inserting a universal 10 mm replacement.
- Temporary fixes like hose clamps, cushions, or tape can slow sinking until you replace the cylinder, though these workarounds rarely last more than a week or two.
- Call a professional furniture repair specialist if your chair’s base is damaged, you can’t find a replacement cylinder, or the collar is stuck—otherwise, cylinder replacement is a straightforward DIY project requiring no special tools.
Why Your Office Chair Is Sinking
Pneumatic Cylinder Failure
Your office chair’s height adjustment works through a pneumatic cylinder, a sealed metal tube filled with pressurized gas (usually nitrogen). When you squeeze the lever beneath your seat, you’re releasing or trapping gas inside that cylinder, raising or lowering the chair. Over time, the internal seal deteriorates. Gas leaks out slowly, and the cylinder loses its ability to hold pressure. Once it can no longer maintain that pressure differential, your seat won’t stay at your chosen height. It sinks, often in a single sudden drop or a gradual drift over the course of a workday.
This isn’t a defect unique to cheap chairs. High-end office furniture suffers the same problem because the cylinder itself, not the frame or base, is the failure point. The cylinder typically lasts 3–7 years depending on how often you adjust the chair and how hard you use it. If your chair is still structurally sound and you like its design, replacing the cylinder is far smarter than scrapping it.
Quick Diagnostic Test
Before you assume the cylinder is dead, confirm that’s actually the problem. Flip your chair upside down (yes, really) and locate the pneumatic cylinder, it’s the shiny metal tube running vertically through the center of the base, attached to the seat platform above.
Grab the cylinder with one hand and press down on the seat with the other. A healthy cylinder resists pressure: a dead one offers almost no resistance. You should feel a slight spring-back effect. If the seat drops like a stone and stays down, or if you can push the cylinder down by hand with barely any force, the seal is broken.
Alternatively, pump the height-adjustment lever repeatedly in a quiet room. A failing cylinder often makes a hissing or squeaking sound as the remaining gas escapes. If you hear that, you’ve confirmed the diagnosis. This simple test takes 30 seconds and saves you from chasing other problems.
DIY Repair Solutions
Replacing the Gas Cylinder
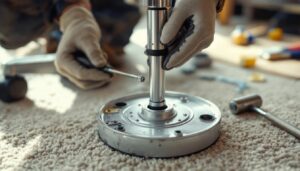
Replacing the pneumatic cylinder is the permanent fix. You’ll need a replacement cylinder (search online for your specific chair model, or buy a universal standard 10 mm cylinder that fits most office chairs), a rubber mallet, and a hex key or small pry bar.
- Flip the chair upside down on a soft surface like a carpet or towel to avoid scratching the base.
- Locate the base-to-cylinder connection. The cylinder is held in place by a metal collar or clip at both the top (seat platform) and bottom (base).
- Remove the bottom collar. Using a hex key or pry bar, gently tap the collar upward or use a small amount of leverage to pop it free. It may take light force, don’t hammer it: a rubber mallet works better than a steel one to avoid denting the cylinder.
- Slide the old cylinder out. It should come free with a gentle twist. Watch out: if there’s any remaining pressure, gas may escape with a quick hiss.
- Insert the new cylinder. Align it straight and push firmly upward. You’ll feel it seat into the collar above.
- Secure the bottom collar. Press or tap it back down over the cylinder base until it clicks or sits flush. Make sure it’s level.
- Flip the chair over and test. Adjust the height several times. The lever should feel firm with clear resistance, and the seat should hold at your chosen height without drifting.
The whole process is under 20 minutes for most people. If you’re uncomfortable working upside down or the collar won’t budge, a second pair of hands makes it easier and safer.
Temporary Fixes and Workarounds
If you don’t want to replace the cylinder right now or you’re waiting for a replacement to arrive, a few temporary solutions can buy you time:
Hose clamp or cable tie method: Wrap a heavy-duty hose clamp or zip tie snugly around the cylinder to limit gas escape. It won’t restore full function, but it can slow the sinking. Tighten it just enough to feel resistance when you pump the lever.
Cushion or wedge: Place a thick pillow, foam wedge, or even a folded towel under the seat. It won’t adjust height, but it raises the seat permanently and makes sitting more comfortable.
PVC pipe or packing tape method: Some DIYers wrap the cylinder with PVC tape or even duct tape as a temporary seal. It rarely works for more than a week or two, but in a pinch, it can extend the life of a failing cylinder just long enough to receive a replacement part.
When to Call a Professional
Most office chair fixes are DIY-friendly, but a few scenarios warrant calling in help or buying a new chair.
If the base or casters are cracked or bent: The cylinder is just one part of the system. If the base itself is damaged or the wheels won’t roll smoothly, replacing only the cylinder won’t fully solve your problem. A pro can assess whether the structural damage is worth repairing.
If you can’t locate a replacement cylinder for your specific model: Some specialty or vintage chairs use proprietary cylinders that are hard to source. If you can’t find the right part online or through the manufacturer after a genuine search, a professional upholsterer or furniture repair shop may have access to alternatives or custom parts.
If the cylinder is stuck or the collar won’t budge: Seized metal, rust, or over-torqued connections can make removal nearly impossible without damaging the chair. A shop with the right leverage and experience can extract it safely. Forcing it yourself risks cracking the base.
If you simply prefer not to do it: A furniture repair specialist or upholsterer can handle the job in under an hour, typically charging $50–$150 depending on your location and the complexity. Sometimes peace of mind and convenience are worth the cost.
For most DIYers with a standard office chair and a healthy base, though, the cylinder replacement is a straightforward task. Many home improvement guides walk through similar mechanical repairs with the same straightforward steps. If you’re already handy with basic projects like assembling furniture or fixing cabinet hardware, you have the skills for this job.